

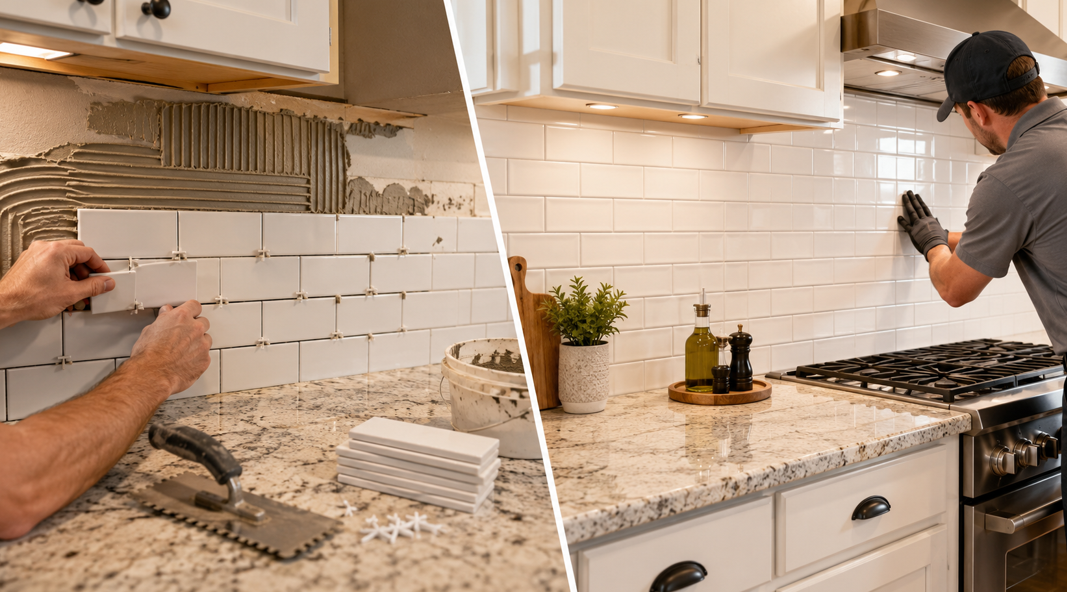
Choosing the Right Approach for Your Kitchen or Bathroom
A new tile backsplash can change the look of a kitchen or bathroom without requiring a full-room renovation. It can introduce color, texture, pattern, and personality while protecting the wall behind sinks, counters, and cooking areas.
The installation method matters just as much as the tile itself. Some Hoover homeowners enjoy hands-on projects and may feel comfortable installing a simple backsplash. Others prefer to have an experienced installer handle layout, cutting, surface preparation, and finishing details.
At Prattville Carpet, we help Alabama homeowners compare beautiful tile options and understand what is involved in creating a polished finished space. A backsplash may cover a relatively small area, but accurate measurements and careful installation make a noticeable difference.
A DIY installation may offer flexibility and personal satisfaction. Professional installation may provide greater consistency, efficiency, and confidence, especially when the design includes detailed patterns, uneven walls, numerous outlets, or specialty materials.
The right choice depends on the tile, the condition of the wall, the complexity of the design, and the homeowner’s experience. Understanding the differences before buying materials can help prevent wasted tile, unplanned costs, and a result that does not match the original vision.
What Does a Tile Backsplash Do?
A backsplash is a tiled wall surface commonly installed behind countertops, sinks, cooktops, or bathroom vanities. It protects painted drywall from splashes, cooking residue, moisture, and everyday marks.
Backsplashes also have a strong visual role. They can connect cabinets, countertops, floors, appliances, and wall colors into one coordinated design.
A well-planned backsplash may:
Make a neutral room feel more finished
Add contrast to cabinets and countertops
Introduce a pattern without overwhelming the space
Create an easy-to-clean surface
Highlight a cooktop, sink, or vanity
Help define the style of the room
The project may look straightforward because the area is smaller than a floor or shower wall. However, backsplashes often include outlets, switches, corners, window trim, cabinets, and uneven stopping points. Each detail affects the layout.
Before deciding between DIY and professional installation, homeowners need to consider more than the number of square feet involved.
What Is Involved in a DIY Tile Backsplash Installation?
A DIY backsplash project usually includes measuring, surface preparation, layout planning, adhesive application, tile cutting, setting, grouting, and sealing where required.
The basic process may involve:
Measuring the backsplash area
Choosing tile and grout
Removing wall plates and protecting nearby surfaces
Cleaning and preparing the wall
Planning the tile layout
Cutting tiles around edges and outlets
Applying the correct adhesive
Setting and spacing the tile
Allowing the installation to cure
Applying grout
Cleaning grout residue
Sealing the tile or grout when needed
Reinstalling wall plates and finishing exposed edges
Each stage affects the next. An inaccurate starting line can create uneven rows. Poor surface preparation can weaken adhesion. Inconsistent spacing becomes more visible after grout is applied.
Homeowners also need suitable tools. Depending on the tile, the project may require a wet saw, tile cutter, notched trowel, spacers, level, grout float, mixing tools, sponges, safety glasses, and edge-finishing materials.
A first-time installer may need additional time to learn how the products and tools work before beginning on the wall.
Benefits of Installing a Tile Backsplash Yourself
DIY installation can be a rewarding option when the project is simple and the homeowner has realistic expectations.
Greater Control Over the Schedule
A DIY project can be completed around work, family, and other commitments. Homeowners can install one section at a time without coordinating an installation appointment.
This flexibility can be helpful, but the kitchen or bathroom may remain partially unavailable for longer than expected. Adhesive and grout also need proper curing time, so rushing between stages can affect the final result.
Personal Satisfaction
Completing a visible home improvement project can provide a strong sense of accomplishment. A backsplash is used and seen every day, making the finished work feel especially personal.
DIY may be appealing to homeowners who already have experience with measuring, cutting, wall preparation, or similar renovation work.
Potential Labor Savings
Handling the work personally may reduce the initial labor portion of the project. However, the true cost needs to include tools, safety equipment, extra tile, adhesive, grout, edge trim, and possible repairs.
A tool that will be reused on future projects may offer good value. Buying or renting several tools for one small backsplash can reduce the expected savings.
Freedom to Work at Your Own Pace
DIY installers can stop to reconsider a layout, test different grout colors, or make design adjustments during the project.
That freedom works best when changes are made before adhesive is applied. Once tile begins setting, delays or unplanned adjustments can create alignment and curing concerns.
Challenges of a DIY Backsplash
The main difficulty of a backsplash is not covering the open wall. It is creating clean details around everything that interrupts the tile.
Creating an Even Layout
A professional-looking backsplash begins with a balanced layout. Homeowners need to determine where full tiles, cut tiles, and pattern focal points will appear.
Starting from the wrong location may leave narrow pieces at a visible edge. It may also cause a decorative pattern to look off-center behind a sink or cooktop.
Cabinets and countertops are not always perfectly level. Following an uneven surface without checking it can make the entire installation appear slanted.
Cutting Around Outlets and Switches
Outlets and switches often require L-shaped, U-shaped, or narrow tile cuts. These cuts can be challenging, particularly with glass, porcelain, or brittle decorative pieces.
The tile needs to sit close enough for the wall plate to cover the opening without interfering with the electrical box. Homeowners also need to follow appropriate electrical safety practices when removing wall plates or working near electrical components.
Any electrical relocation or wiring work needs to be handled by an appropriately qualified professional.
Working With Corners and Exposed Edges
Outside corners, window returns, cabinet ends, and open wall edges need a finished transition. Depending on the design, this may involve bullnose tile, metal trim, matching edge pieces, or carefully polished cuts.
These details need to be planned before tile is ordered. Discovering late in the project that a selected collection has no suitable edge piece can limit the available options.
Mixing and Applying Materials Correctly
Adhesive and grout need to be selected for the tile material and installation surface. The wrong product can affect bonding, curing, appearance, or long-term performance.
Applying too much adhesive may cause it to squeeze between the joints. Applying too little can leave unsupported areas behind the tile. Grout mixed too wet may develop inconsistent color or reduced strength.
Manufacturer instructions provide important guidance for mixing, open time, curing, cleaning, and sealing.
Managing Imperfect Walls
Older and heavily used homes may have walls that are bowed, patched, textured, or slightly uneven. Tile does not automatically hide those conditions.
Small variations can become obvious through shadow lines, uneven tile edges, or inconsistent grout joints. Some surfaces need repair, cleaning, sanding, or priming before tile is installed.
What Professional Tile Installation Includes
A professional backsplash installation typically begins with measurement and an assessment of the wall, tile, pattern, and surrounding features.
The installer may review:
Wall condition
Tile dimensions and material
Pattern direction
Grout joint size
Starting and stopping points
Edge-finishing options
Outlet and switch placement
Countertop and cabinet alignment
Adhesive and grout requirements
Cutting and waste allowances
This planning helps establish a clear layout before permanent materials are applied.
Professional installers also bring tools and experience suited to the tile. They understand how different materials respond to cutting, how to manage pattern repeats, and how to create clean transitions around obstacles.
The installation still requires appropriate curing time. Professional service does not remove the need for the adhesive and grout to set, but it can make the active working stages more efficient and predictable.
Benefits of Professional Installation
Professional installation can be especially valuable when the backsplash includes complex design features or expensive materials.
More Consistent Alignment
Experienced installers use reference lines and layout planning to keep rows level and grout joints consistent. They can also make adjustments when countertops, walls, or cabinets are not perfectly straight.
This attention helps the finished backsplash look intentional rather than simply fitted into the available space.
Cleaner Cuts and Transitions
Cut edges are often placed near cabinets, corners, outlets, windows, and trim. Professional tools and cutting experience can produce cleaner results with less material waste.
This becomes increasingly important with glass tile, natural stone, mosaics, large-format pieces, or directional patterns.
Better Pattern Planning
Herringbone, chevron, stacked, basketweave, and offset patterns require more planning than a basic horizontal layout. The installer needs to keep the design centered and consistent while managing cuts along every edge.
A small alignment error near the starting point can become more visible as the pattern continues across the wall.
Efficient Material Use
Tile is normally ordered with extra material for cuts, breakage, pattern matching, and future repairs. An experienced installer can estimate waste more accurately and plan cuts efficiently.
Special-order tile may have long replacement times or variation between production batches. Careful handling helps protect the available material.
A More Predictable Finished Result
Professional installation gives homeowners a clearer idea of how the finished project will look. The installer can identify potential concerns before work begins and recommend practical adjustments.
This can be especially helpful when the backsplash is part of a larger renovation involving new countertops, cabinets, flooring, appliances, or lighting.
Comparing DIY and Professional Installation Costs
DIY may appear more affordable because there is no professional labor charge. However, a complete comparison needs to include more than labor.
DIY expenses may include:
Tile
Extra tile for errors and practice cuts
Adhesive
Grout
Sealer
Edge trim
Spacers
Trowels
Grout floats
Buckets and sponges
Tile-cutting tools
Tool rental
Surface repair materials
Protective equipment
Replacement materials if errors occur
Professional installation usually combines labor, experience, tools, layout planning, cutting, and finishing. Product and preparation costs may remain separate depending on the project.
Homeowners can explore available tile flooring styles to compare colors, formats, textures, and materials before deciding which installation approach fits the design.
The lowest initial cost is not always the best measure of value. A simple ceramic backsplash may be manageable for an experienced DIY homeowner. A detailed glass mosaic or natural stone pattern may justify professional installation because the material is less forgiving and more costly to replace.
Which Tile Materials Are Easier to Install?
The tile material influences cutting, spacing, adhesive selection, sealing, and maintenance.
Ceramic Tile
Ceramic is often considered one of the more approachable options for a straightforward backsplash. It is available in many colors, shapes, and finishes and may be easier to cut than denser materials.
Glazed ceramic provides a practical, easy-to-clean surface. Handmade-look ceramic may have intentional variation in size, shape, or glaze, which requires careful spacing.
Porcelain Tile
Porcelain is dense and durable. Its strength can make it more challenging to cut without suitable equipment.
Large-format porcelain can create fewer grout joints and a clean look, but the wall needs to be flat. Even small surface variations can affect alignment.
Glass Tile
Glass reflects light and can make a kitchen or bathroom feel brighter. It also reveals adhesive coverage and cutting imperfections more readily than opaque tile.
Special blades, adhesives, and installation techniques may be recommended. Chipped edges can be highly visible, so glass often benefits from professional handling.
Natural Stone
Marble, travertine, slate, and other natural stones create distinctive character. They may vary in tone, veining, thickness, or surface texture.
Some stone needs sealing before grouting, and certain products can be sensitive to acidic cleaners or unsuitable adhesives. Natural variation needs to be reviewed and arranged before installation.
Mosaic Tile
Mosaics are mounted on sheets, but that does not always make them simple to install. The spacing between sheets needs to match the spacing within each sheet.
If the sheets are misaligned, visible lines may appear across the finished wall. Small individual pieces also create more grout joints and detailed cutting around outlets.
How Design Complexity Affects the Decision
A basic horizontal subway tile layout is generally more manageable than a diagonal, herringbone, or mixed-material pattern.
DIY may be more realistic when:
The backsplash wall is flat and in good condition
The tile is easy to cut
The layout uses a simple repeating pattern
There are few outlets and corners
The stopping points are clearly defined
The homeowner has suitable tools and experience
There is enough time to work carefully
Professional installation may be preferable when:
The design uses herringbone, chevron, or diagonal placement
The tile is glass, stone, oversized, or handmade
The wall has uneven areas
The backsplash includes many outlets or windows
Multiple materials need to align
The tile has strong pattern or color variation
Exposed edges require detailed finishing
The material is costly or difficult to replace
The size of the backsplash is not the only measure of difficulty. A small wall with a complex pattern may require more precision than a larger wall with a simple layout.
Questions to Ask Before Beginning a DIY Project
Before purchasing materials, homeowners can use a practical checklist.
Ask:
Is the wall clean, flat, stable, and suitable for tile?
Does the existing surface need repair or priming?
Can the chosen tile be cut with available tools?
How will exposed edges be finished?
Where will the layout begin?
Will narrow cut pieces appear in visible areas?
Are the countertop and cabinets level?
How many outlets, switches, and corners require detailed cuts?
Does the tile or grout need sealing?
What adhesive does the manufacturer recommend?
How long do the materials need to cure?
Is there enough extra tile for errors and future repairs?
A small test layout can reveal pattern, spacing, and color concerns before installation begins. For tile with noticeable variation, open several boxes and blend pieces from different cartons.
How to Prepare for Professional Installation
Professional installation still benefits from homeowner planning.
Before the installer arrives:
Confirm the final tile and grout choices.
Decide where the backsplash will start and stop.
Discuss edge trim and transition pieces.
Remove small appliances and countertop items.
Confirm access to the work area.
Ask whether outlet extenders or electrical adjustments are needed.
Review who will handle wall repairs.
Discuss curing time and when the area can be cleaned or used.
Keep several extra tiles for possible future repairs.
Tell the installer about any known plumbing leaks, wall repairs, or previous moisture concerns. Clear communication makes it easier to plan the work and avoid unexpected changes.
Cleaning and Maintaining a Tile Backsplash
A properly installed backsplash is generally easy to maintain.
For regular care:
Wipe splashes before they dry.
Use a soft cloth or non-abrasive sponge.
Choose a cleaner approved for the tile and grout.
Avoid harsh scrubbers that may scratch glazed or polished surfaces.
Clean cooking residue regularly near ranges.
Reapply sealer when recommended for the tile or grout.
Maintenance varies by material. Glazed ceramic and porcelain are typically straightforward to clean. Natural stone may require pH-neutral products. Glass can show streaks more easily, while textured tile may need attention in recessed areas.
Grout color also affects the appearance of daily use. Light grout creates contrast with darker tile but may require more frequent cleaning. Medium or darker neutral grout can make everyday marks less noticeable.
DIY or Professional Installation: Which Is Right for You?
DIY installation may suit a Hoover homeowner who has renovation experience, suitable tools, a well-prepared wall, and a simple tile design. The project can provide flexibility and personal satisfaction when there is enough time to measure, cut, and set each piece carefully.
Professional installation may offer stronger value when the material or pattern leaves little room for error. It can also help homeowners who want the project completed efficiently without investing in specialty tools.
Consider professional installation when the project includes:
Natural stone or glass
Detailed mosaics
Herringbone or diagonal patterns
Multiple outside corners
Uneven walls
Numerous electrical outlets
Expensive or special-order tile
Precise alignment with cabinets or architectural details
The decision does not need to be based only on whether a homeowner is capable of installing tile. Time, tool access, material cost, and expectations for the final appearance all matter.
Create a Backsplash That Completes the Room
A tile backsplash can provide both everyday protection and a defining design feature for a Hoover kitchen or bathroom. The right installation approach depends on the wall, tile, pattern, budget, and homeowner’s experience.
DIY can work well for a carefully planned project with a simple design and manageable cuts. Professional installation can provide more consistent alignment, cleaner transitions, and added confidence when the material or layout is complex.
Before deciding, look beyond the square footage. Consider the number of outlets, the condition of the wall, the required tools, the cost of extra material, and the level of precision the design demands.
Prattville Carpet is a family-owned flooring specialist with more than 75 years of combined flooring experience. Our knowledgeable team offers personal guidance, quality products, professional installation, and attentive service from product selection through project completion.
Ready to explore tile options for your Hoover backsplash? Get in touch for personalized guidance and a professional in-home estimate.


